You have decided to leave Canny. Maybe your tracked-user costs tripled after a product launch. Maybe you need self-hosting for compliance. Maybe you want features that Canny does not offer. Whatever the reason, the migration itself should not be the hard part.
Most teams overthink this. A feedback tool migration is simpler than migrating a database, a CRM, or an auth provider. Your core data is posts, votes, comments, users, and statuses. The process takes a few hours of preparation, an export, an import, and a week of communication.
This guide walks through the full process regardless of which tool you are migrating to.
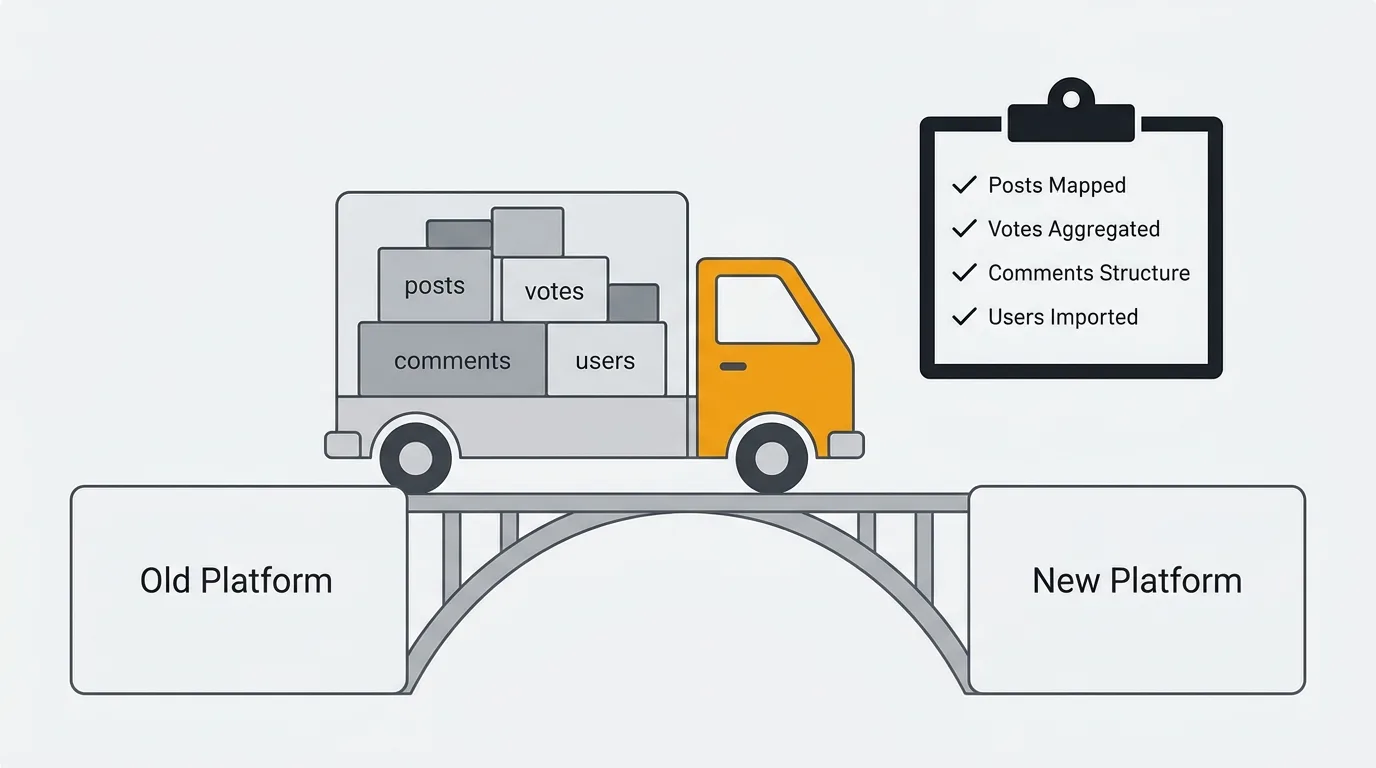
To migrate from Canny: audit your data, set up your new tool, export from Canny (via the admin dashboard CSV or the API), import into your destination, verify counts, then communicate the switch to your team and users. Your core data is posts, votes, comments, users, and statuses. A tool with a dedicated Canny importer — like Quackback — moves all of it in a single operation, and most teams finish in under a week.
When it is time to leave Canny
Not every frustration justifies a migration. Switching tools has real costs — team retraining, user communication, and a brief period where your feedback workflow is disrupted. But some signals are clear.
Your costs are unpredictable. Canny's tracked-user pricing means your bill scales with engagement, not with your team size. A single viral feature request can push you into the next pricing tier automatically. If you cannot predict your monthly cost within 20%, the pricing model is working against you. For a detailed breakdown of how this plays out at different scales, see our Canny pricing analysis.
You need self-hosting. Canny is a closed-source SaaS product with no self-hosting option. If your security team requires data to stay on your infrastructure, or your compliance framework mandates it, Canny is not an option regardless of features or pricing.
You have outgrown the feature set. Canny covers the basics well: feature request boards, voting, roadmaps, changelogs. But if you need AI-powered feedback analysis, an MCP server for agent integrations, advanced analytics, or a knowledge base, you will need to look elsewhere.
You want source code access. With a closed-source tool, you cannot audit the code, extend it, or fork it if the product changes direction. For teams that value vendor independence, this matters.
If you are still evaluating whether to switch, our Canny alternatives comparison covers seven options with honest pros and cons.
What you can export from Canny
Canny provides data export through both the admin dashboard and their API.
Dashboard export
From your Canny admin panel, you can export:
- Posts — title, description, status, category, tags, creation date, author
- Votes — which users voted on which posts
- Comments — comment text, author, timestamps
- Users — email, name, avatar URL, creation date
- Changelogs — published entries with dates and content
Exports typically come as CSV files. This is the easiest path for most migrations — no code required.
API export
Canny's API provides programmatic access to the same data with more granularity. Use the API if you need:
- Full comment threading (parent-child relationships)
- Custom field values
- Vote timestamps (not just who voted, but when)
- Pagination through large datasets
The relevant API endpoints are /posts/list, /votes/list, /comments/list, and /users/list. All require your API key and return paginated JSON. See the Canny API reference for the current request and response formats. (API details last verified May 2026.)
What you cannot export
Some data does not come with you:
- Internal notes and admin-only comments may not be included in standard exports
- Merge history — if you merged duplicate posts in Canny, the merged posts may export as separate entries
- Analytics and engagement metrics — page views, unique visitors, and funnel data stay in Canny
- Webhook configurations and integrations — these need to be recreated in your new tool
Migration checklist
Step 1: Audit your current data
Before exporting anything, understand what you have.
- How many posts? Hundreds are trivial. Thousands may require the API route.
- How many active users? These are the people you need to communicate with.
- What statuses do you use? Map your Canny statuses (Open, Under Review, Planned, In Progress, Complete, Closed) to your new tool's status model.
- What categories and tags exist? Document them. You will need to recreate or map them.
- Are there merged posts? Check if merged posts need to be consolidated or kept separate.
Step 2: Set up your new tool
Create your account and configure the basics before importing data:
- Create boards that match your Canny board structure (or take the opportunity to restructure)
- Set up statuses that map to your Canny statuses
- Create categories and tags
- Configure your team members and permissions
- Set up your widget or portal so it is ready for users after the switch
Step 3: Export from Canny
Run your export from the Canny admin dashboard or API. Verify the data before proceeding:
- Spot-check that post counts match what you see in Canny
- Verify that votes are attached to the correct posts
- Check that comments preserved their threading
- Confirm that user emails are included (you need these to re-associate identities)
Step 4: Import into your new tool
How this works depends on your destination tool.
If your new tool has a Canny importer: Use it. A purpose-built importer handles the data mapping, status translation, and user matching automatically. This is the fastest path.
Quackback ships a dedicated Canny importer that connects to the Canny API and maps the data model directly — posts, votes, comments, users, statuses, tags, and even changelog entries and merge relationships come across in a single run. You run the import tool with your Canny API key and a Quackback admin key (run it with a dry run first to validate); no CSV wrangling required. Quackback is open source and self-hosted, so the engagement spikes that pushed up your Canny bill do not follow you. See the import and export feature for the full data mapping.
If your new tool accepts CSV imports: Map your Canny CSV columns to the tool's expected format. Pay attention to:
- Date formats (Canny's API returns ISO 8601 timestamps; confirm your CSV export matches what your destination expects)
- Status mapping (names may differ between tools)
- User matching (email is usually the join key)
If your new tool only has an API: Write a migration script that reads your Canny export and creates records through the destination API. This is more work but gives you the most control over how data is mapped.
Step 5: Verify the import
After importing, check:
- Post count — does it match your Canny export?
- Vote counts — pick five popular posts and verify vote totals
- Comments — check that threading is preserved and authors are correct
- Statuses — verify that Canny statuses mapped to the correct new statuses
- User profiles — spot-check that user emails and names came through
Step 6: Update your integrations
If you had Canny connected to other tools, recreate those connections:
- Slack integration — reconnect to your feedback channels
- Jira or Linear — re-link issue tracking
- Webhooks — update any custom webhooks to point to your new tool's endpoints
- Widget embed — replace the Canny widget script in your product with your new tool's widget
Step 7: Communicate the switch
This is the step most teams skip, and it causes the most friction.
For your team: Send a brief message explaining what changed, where to find the new feedback tool, and how the workflow differs. Do this before the switch, not after.
For your users: If you have a public-facing feedback portal, your users need to know where to go. Options:
- Send an email to active feedback contributors (anyone who posted or voted in the last 90 days)
- Post a changelog entry announcing the new feedback portal
- Add a redirect or notice on your old Canny URL if possible
- Update links in your product, help docs, and website
Keep the message simple: "We moved our feedback board to [new URL]. Your existing posts and votes have been migrated. Here is where to submit new feedback."
URL redirects
If your Canny board was at yourcompany.canny.io or a custom subdomain, you likely cannot set up server-side redirects on Canny's domain. Instead:
- Update all internal links in your product, docs, and website
- If you used a custom domain (like
feedback.yourcompany.com) with a CNAME to Canny, you can repoint that DNS record to your new tool - Add a meta refresh or redirect page at your old custom domain if you control it
Timeline
A realistic migration timeline for a team with under 5,000 posts:
| Day | Action |
|---|---|
| Day 1 | Audit data, set up new tool, configure boards and statuses |
| Day 2 | Export from Canny, import into new tool, verify data |
| Day 3 | Update integrations, replace widget embed, test end-to-end |
| Day 4 | Communicate to team and users, go live |
| Day 5-7 | Monitor for issues, answer questions, verify nothing was missed |
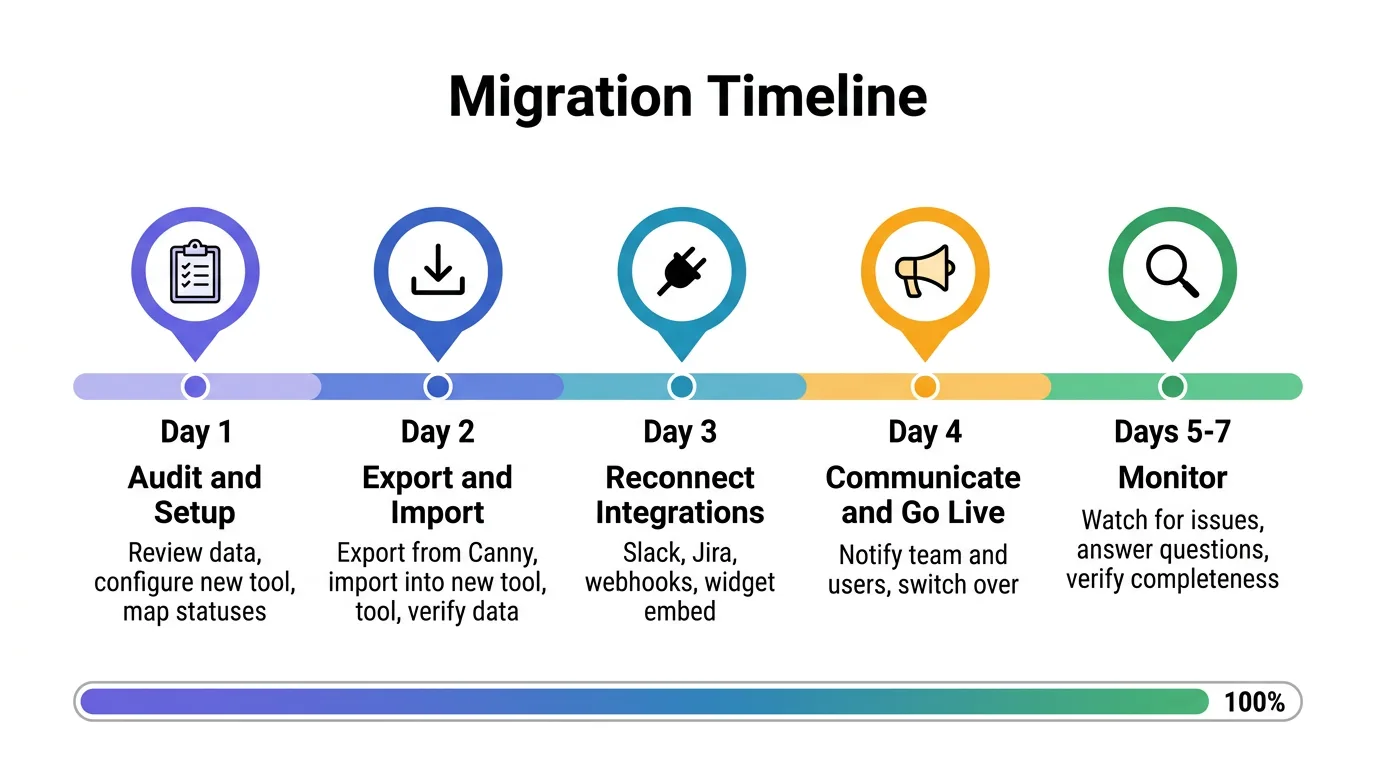
For larger datasets or complex configurations, add a day or two. But this is not a month-long project. Most teams complete the migration in under a week.
After the migration
Keep your Canny account active for 30 days. Do not delete it immediately. You may need to reference historical data, check something that did not import correctly, or handle a user who did not get the memo.
Monitor your new feedback volume. A temporary dip in submissions is normal after any tool switch. If volume does not recover within two weeks, check that your widget is working, your portal is discoverable, and your communication reached active users.
Clean up stale data. A migration is a good opportunity to close old posts that are no longer relevant. If a feature request has been open for two years with three votes, it is probably not coming. Archive it.
If Quackback is your destination, the dedicated Canny importer brings posts, votes, comments, users, and statuses across in one run — and you land on an open source tool with AI feedback analysis, an MCP server for agent workflows, and full data ownership. See Quackback vs Canny for the full comparison, or follow the migration guide in the docs.
Try Quackback — open source with a managed cloud option. Start free. Get started | View on GitHub
Frequently asked questions
Will I lose votes if I migrate from Canny?
No, if you use a tool with a Canny importer or import via the API. Votes are tied to user records by email. As long as user emails are preserved in the import, votes map to the correct users in your new tool.
How long does a Canny migration take?
Most teams complete the migration in three to five days, including communication. The actual data export and import takes a few hours. The rest is configuration, testing, and user communication.
Can I migrate from Canny for free?
Yes. Canny's data export is available on all plans, including free. The cost of migration is primarily your team's time, not licensing fees. Many destination tools — including open-source options like Quackback — are free to use.
Should I migrate all historical data or start fresh?
Migrate everything. Historical vote counts and comment threads represent months or years of accumulated user signal. Starting fresh throws away data that helps you prioritize. The one exception is very old posts (2+ years) with minimal engagement — archive those after migration to keep your board focused.
What if my team uses Canny's API for custom integrations?
Document your API integrations before migrating. Most feedback tools offer similar API endpoints (create post, list posts, cast vote, add comment). You will need to update your API calls to use the new tool's endpoints and authentication, but the data model is usually similar enough that the migration is straightforward.
Authored by James Morton
Founder of Quackback. Building open-source feedback tools.
Try Quackback
The open-source feedback platform. Boards, voting, and roadmaps.
Get startedStar on GitHub132